文章主要介绍了html5 canvas 实现光线沿不规则路径运动,本文通过实例代码给大家介绍的非常详细,需要的朋友可以参考下。
g让动画沿着不规则路径运动
查阅svg文档后发现,svg动画运动有两种实现方式,且都非常简单,但对于100%实现设计师给出的效果有很大的距离
使用offset-path偏移路径和offset-roate偏移角度让元素沿着不规则路径走
<!DOCTYPE html>
    <html>
    <head>
        <title>offset-path/offset-roate</title>
    </head>
    <style type="text/css">
        * {
            padding: 0;
            margin: 0;
            box-sizing: border-box;
        }
        body {
            background: #000;
        }
        .line {
            width: 80px;
            height: 3px;
            position: absolute;
            background: red;
            offset-path: path("M10 80 L 77.5 60 L 145 80 L 280 100 L 500 80 L 600 120 L 800 80 L 950 120 L 950 200 L 930 250 L 950 300 L 950 500");
            animation: move 10s linear infinite;
        }
        @keyframes move {
            100% {
                offset-distance: 2000px;
            }
        }
        .line1 {
            position: absolute;
            left: 100px;
            width: 20px;
            height: 20px;
            border-radius: 50%;
            background: red;
            offset-path: path("M0,0a72.5,72.5 0 1,0 145,0a72.5,72.5 0 1,0 -145,0");
            offset-rotate: 0deg;
            animation: load 1.8s cubic-bezier(0.86, 0, 0.07, 1) infinite;
            animation-delay: 0.147s;
            animation-fill-mode: forwards;
        }
        @keyframes load {
            from {
                offset-distance: 0;
            }
            to {
                offset-distance: 100%;
            }
        }
    </style>
    <body>
        <h2>路径偏移</h2>
        <div class="line"></div>
        <svg width="100%" height="600px" version="1.0" id="svg1">
            <path d="M10 80 L 77.5 60 L 145 80 L 280 100 L 500 80 L 600 120 L 800 80 L 950 120 L 950 200 L 930 250 L 950 300 L 950 500" fill="#tranparent" stroke="#FFF"></path>
        </svg>
        <h2>角度偏移</h2>
        <div class="line1">
        </div>
    </body>
    </html>
此种方式的限制是滚动元素无法随路径进行没有规律的变化
使用stroke-dasharray和stroke-dashoffset让路径边线动起来
stroke-dasharray:设置shap和text 边框虚线的实线长度与实线之间的间隔(虚线长度)
stroke-dashoffser:设置边框线条相对于默认位置的偏移(正值:向左,负值:向右)
<!DOCTYPE html>
    <html>
    <head>
        <title>stroke-dasharray/stroke-dashoffser</title>
    </head>
    <style type="text/css">
        * {
            padding: 0;
            margin: 0;
            box-sizing: border-box;
        }
        body {
            background: #000;
            color: #fff;
        }
        .move {
            animation: moving 5s infinite;
        }
        @keyframes moving {
            0% {
                stroke-dashoffset: 80px;
            }
            100% {
                stroke-dashoffset: -1600px;
            }
        }
    </style>
    <body>
    <h2>设置stroke-dasharray</h2>
    <b>storke-dasharray设置为80 ,此时实线和实线间隔一样</b>
    <svg width="100%" height="600px" version="1.0" id="svg1">
        <path d="M10 80 L 77.5 60 L 145 80 L 280 100 L 500 80 L 600 120 L 800 80 L 950 120 L 950 200 L 930 250 L 950 300 L 950 500" fill="#tranparent" stroke="#FFF" stroke-dasharray="80"></path>
    </svg>
    <b>storke-dasharray设置为80 320,此时实线和是实线间隔的1/4</b>
    <svg width="100%" height="600px" version="1.0" id="svg1">
        <path d="M10 80 L 77.5 60 L 145 80 L 280 100 L 500 80 L 600 120 L 800 80 L 950 120 L 950 200 L 930 250 L 950 300 L 950 500" fill="#tranparent" stroke="#FFF" stroke-dasharray="80 320"></path>
    </svg>
    <h2>设置stroke-dashoffset让边线相对于初始位置发生偏移</h2>
    <svg width="100%" height="600px" version="1.0" id="svg1">
        <path d="M10 80 L 77.5 60 L 145 80 L 280 100 L 500 80 L 600 120 L 800 80 L 950 120 L 950 200 L 930 250 L 950 300 L 950 500" fill="#tranparent" stroke="#FFF" stroke-dasharray="80 320" stroke-dashoffset="40"></path>
    </svg>
    <h2>通过设置stroke-dasharray 和 stroke-dashoffset让边线动起来</h2>
    <svg width="100%" height="600px" version="1.0" id="svg1">
        <path d="M10 80 L 77.5 60 L 145 80 L 280 100 L 500 80 L 600 120 L 800 80 L 950 120 L 950 200 L 930 250 L 950 300 L 950 500" fill="#tranparent" stroke="#FFF"></path>
        <path d="M10 80 L 77.5 60 L 145 80 L 280 100 L 500 80 L 600 120 L 800 80 L 950 120 L 950 200 L 930 250 L 950 300 L 950 500" fill="#tranparent" stroke="red" stroke-dasharray="80 1600" stroke-dashoffset="0" class="move"></path>
    </svg>
    </body>
    </html>
此种方式通过边框偏移的效果可以设置跟随路径的滚线条,但是无法设置线条的光线效果,即实线的阴影和实线的渐变效果(渐变区域需随着偏移路径的变化而变化)
canvas实现线条延不规则路径运动
线条实现
对于不规则路径,如果直接用画线条的方式实现光线,需要计算每一个开始点和结束点的位置,中间还可能存在转折点,计算起来非常麻烦,不可取
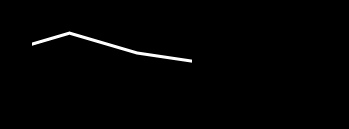
故这边采取canvas组合图形的模式,取线条和一个图形重叠部分(类似于灯罩)来实现光线效果
组合前
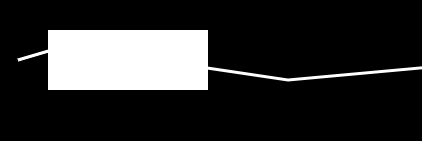
组合后
<!DOCTYPE html>
    <html>
    <head>
        <title>canvas实现不规则路径光效</title>
    </head>
    <style type="text/css">
        body {
            background: #000;
        }
        #wrap {
            position: absolute;
            width: 1200px;
            height: 600px
        }
    </style>
    <body>
        <div id="wrap">
            <canvas id="canvas" width="1200" height="600"></canvas>
        </div>
    </body>
    <script type="text/javascript">
        var path = 'M 10 80 L 77.5 60 L 145 80 L 280 100 L 500 80 L 600 120 L 800 80 L 950 120 L 950 200 L 930 250 L 950 300 L 950 500';
        var list = path.match(/([A-Z]([^A-Z]){1,})/g).map(item => {
            return {
                x: item.split(' ')[1],
                y: item.split(' ')[2],
                action: item.split(' ')[0],
            }
        });//获取每个点位置
        var canvas = document.getElementById('canvas');
        var ctx = canvas.getContext('2d');
        ctx.strokeStyle = 'rgba(255,255,255,1)';
        function drawPath() {
            ctx.lineWidth = 3;
            ctx.beginPath();
            list.forEach(item => {
                if(item.action == 'M') ctx.moveTo(item.x, item.y);
                if(item.action == 'L') ctx.lineTo(item.x, item.y);
            });
            ctx.stroke();
        }
        drawPath();

        function drawLine() {
            //设置图形组合方式 默认source-over
            ctx.globalCompositeOperation = "destination-in";
            ctx.lineWidth = 60;
            ctx.beginPath();
            ctx.moveTo(40, 80);
            ctx.lineTo(200, 80);
            ctx.stroke();
        }
        drawLine();

    </script>
    </html>
让线条动起来
当我们实现好线条剩下就需要让线条动起来,由于线条是通过灯罩的方式来实现的,让线条运动只需要让灯罩动起来就好

<!DOCTYPE html>
    <html>
    <head>
        <title>canvas实现不规则路径光效</title>
    </head>
    <style type="text/css">
        body {
            background: #000;
        }
        #wrap {
            position: absolute;
            width: 1200px;
            height: 600px
        }
    </style>
    <body>
        <div id="wrap">
            <canvas id="canvas" width="1200" height="600"></canvas>
        </div>
    </body>
    <script type="text/javascript">
        var path = 'M 10 80 L 77.5 60 L 145 80 L 280 100 L 500 80 L 600 120 L 800 80 L 950 120 L 950 200 L 930 250 L 950 300 L 950 500';
        var list = path.match(/([A-Z]([^A-Z]){1,})/g).map(item => {
            return {
                x: item.split(' ')[1],
                y: item.split(' ')[2],
                action: item.split(' ')[0],
            }
        });//获取每个点位置
        var step = 3;
        var x1, x2, y1, y2;//确定路径中最大最小点
        var timer;
        var canvas = document.getElementById('canvas');
        var ctx = canvas.getContext('2d');
        ctx.strokeStyle = 'rgba(255,255,255,1)';
        ctx.shadowColor = 'rgba(255,255,255,1)';
        ctx.lineCap = 'round';
        ctx.shadowBlur = 3;
        list.forEach(item => {
            x1 = !x1 || Number(item.x) < x1 ? Number(item.x) : x1;
            y1 = !y1 || Number(item.y) < y1 ? Number(item.y) : y1;
            x2 = !x2 || Number(item.x) > x2 ? Number(item.x) : x2;
            y2 = !y2 || Number(item.y) > y2 ? Number(item.y) : y2;
        });
        function drawPath() {
            ctx.lineWidth = 3;
            ctx.beginPath();
            list.forEach(item => {
                if(item.action == 'M') ctx.moveTo(item.x, item.y);
                if(item.action == 'L') ctx.lineTo(item.x, item.y);
            });
            //添加光效渐变
            var grd = ctx.createLinearGradient(arrLine[arrLine.length - 1].x, arrLine[arrLine.length - 1].y, arrLine[0].x, arrLine[0].y);
            grd.addColorStop(0, 'rgba(255, 255, 255, 0)');   //定义渐变线起点颜色
            grd.addColorStop(1, 'rgba(255, 255, 255, 1)');  //定义渐变线结束点的颜色
            ctx.strokeStyle = grd;
            ctx.stroke();
        }
        //设计合适的初始线条状态
        var arrLine = Array(10).fill(0).map((item, inx) => {
            return {
                x: x1 - 20 * inx,
                y: y1 + 30,
            }
        });
        //随时间变化图形路径
        function getArrLine() {
            var isEnd
            arrLine = arrLine.map(item => {
                var x = item.x;
                var y = item.y;
                if(x < x2 - 30) {
                    x = x + step > x2 -30 ? x2 - 30 : x + step;
                } else if(x == x2 -30 && y < y2) {
                    y = y + step > y2 ? y2 : y + step;
                } else {
                    isEnd = true;
                }
                return {
                    x,
                    y
                }
            });
            isEnd && timer && cancelAnimationFrame(timer);
        }
        //绘制图形
        function drawLine() {
            //设置图形组合方式 默认source-over
            ctx.globalCompositeOperation = "destination-in";
            ctx.lineWidth = 70;
            ctx.beginPath();
            arrLine.forEach((item, inx) => {
                if(inx == 0) {
                    ctx.moveTo(item.x, item.y);
                } else {
                    ctx.lineTo(item.x, item.y);
                }
            })
            ctx.stroke();
        }

        function start() {
            ctx.clearRect(0, 0, 1200, 600);
            ctx.globalCompositeOperation = 'source-over';
            drawPath();
            drawLine();
            getArrLine();
            timer = requestAnimationFrame(start);
        }

        timer = requestAnimationFrame(start);

    </script>
    </html>
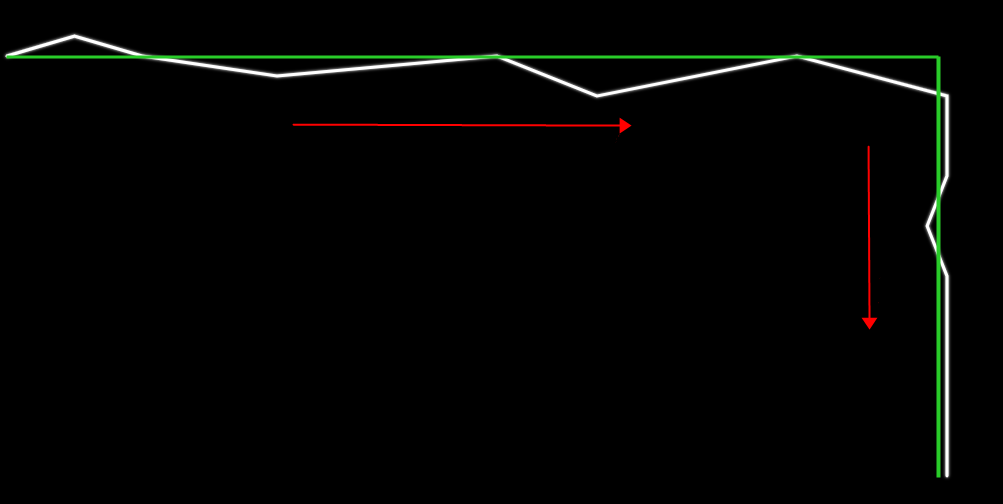
这种实现方式也有一定的条件限制,那就是路径可大体抽象成为一个有一定规律的图型或者线条,比如上面demo中路径可抽象成为一个矩形的两边,或者是2条连接的直线
我们必须从没有具体规则的路径中抽象出一个大体的规则,不同路径规则不同
上面的例子就是将不规则路径抽象成了一个直角的规则路径
可优化点
这边找到了2个可优化的点
1.时间方向上: 为了让动画消耗较小,代码中的定时器已经用的是requestAnimationFrame, 但是由于光线的特殊性(自带模糊效果),为了性能更加,尝试了2次requestAnimationFrame调用一次绘图的方式,效果较前者未有明显区别
2.绘图方向上: 从上图可发现,灯罩每次只圈出路径的一部分,故绘图中不需要每次都绘制全部路径,只需要找出灯罩前后的路径点,将这一段路径绘制出来就好
坑点
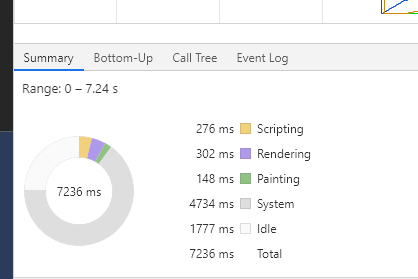
在完成这个动动画效果之后遇到一个至今原因不明的bug,随着屏幕放置时间的变长,动画越来越慢,打开任务管理器,未见内存泄漏或者CPU使用率过高。打开performance,发现页面调帧严重,屏幕帧数越来越低,单个Frame CPU time越来越长,范围来看,script和render和paint耗时未发生线性变化,只有system时间越来越来长,越来越长,期望能被大佬告知原因
一开始
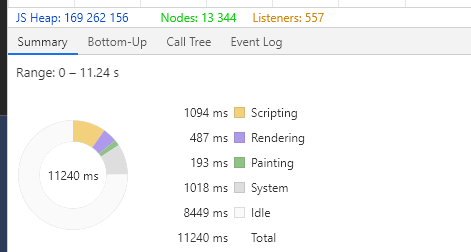
到后来
解决的办法较为...,光线每循环一个周期,我销毁了之前的canvas并新建了canvas,上层规避了system time不知道为什么越来越长的问题
chrome版本:80.0.3987.163(正式版本) (64 位)
到此这篇关于html5 canvas 实现光线沿不规则路径运动的文章就介绍到这了,更多相关canvas 光线不规则运动内容请搜索脚本之家以前的文章或继续浏览下面的相关文章,